CREATE AN INDIE ROCK ALBUM COVER in PHOTOSHOP
Tutorials by Nathan Brown Dec 1, 2010
Week 4 - Photoshop Super Tute
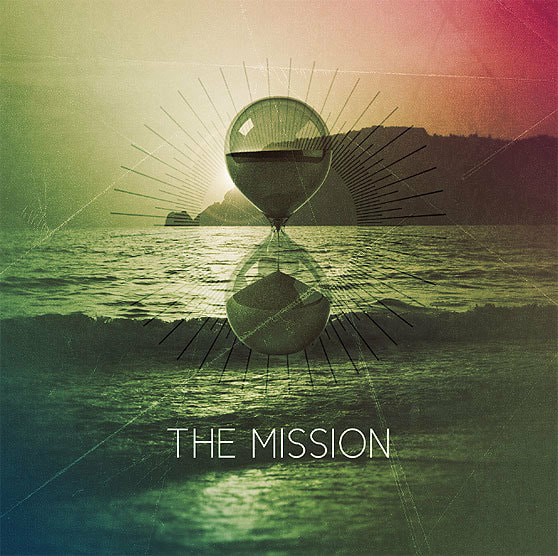
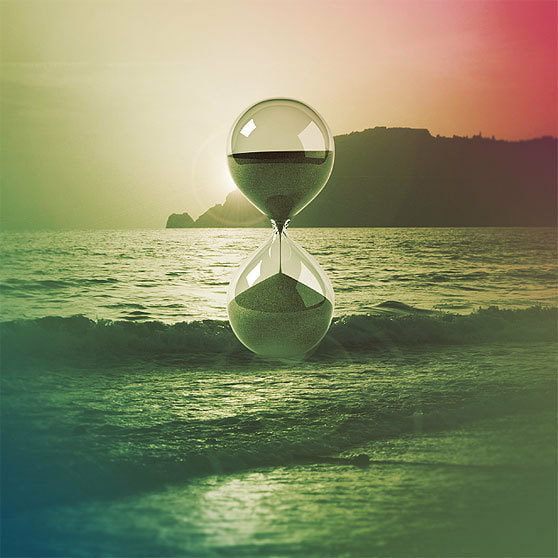
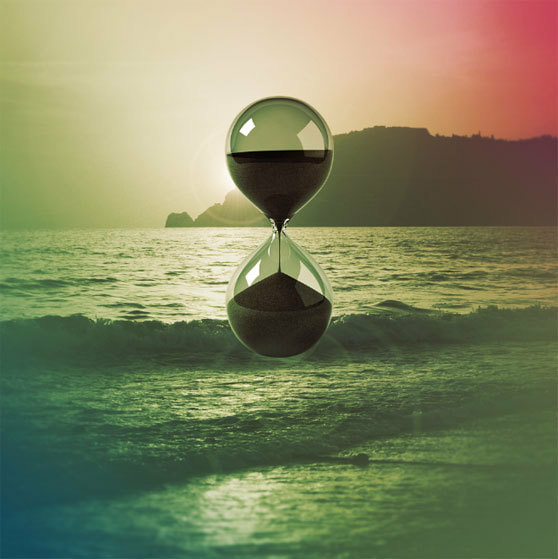
The above image is how the final will look once it's complete.
This is THE BEST Tutorial I have ever found to learn very detailed stuff in Photoshop.
Yes, it's an older version of Ps, but it still gives a LOT of excellent information.
Once I did this Tute, my skills in Photoshop doubled and tripled and so did what I could charge for my work!
This is THE BEST Tutorial I have ever found to learn very detailed stuff in Photoshop.
Yes, it's an older version of Ps, but it still gives a LOT of excellent information.
Once I did this Tute, my skills in Photoshop doubled and tripled and so did what I could charge for my work!

Now, RIGHT-CLICK on the image above to "Save Image As"
Make a New Folder in the 3rd Quarter Folder and call it "Indie Rock CD Cover"
Make 3 more Folders INSIDE that Folder:
Reference: Put all the Reference Images in this Folder
PSD: Save your work in Progress & Final Art in this Folder
JPG: Final Art Proof to send to Babkie
Put these other Images in the Reference Folder also . . .
You will need the following images . . .

VECTOR RADIAL LINES . . . We will do that together in Illustrator.
We will photo-manipulate a sunset scene, then we will combine other elements like
textures and vector resources to finalize the composition.
At the end I will show you how to apply the final design to a cd case mock-up template.
_____________________________________________________________________________
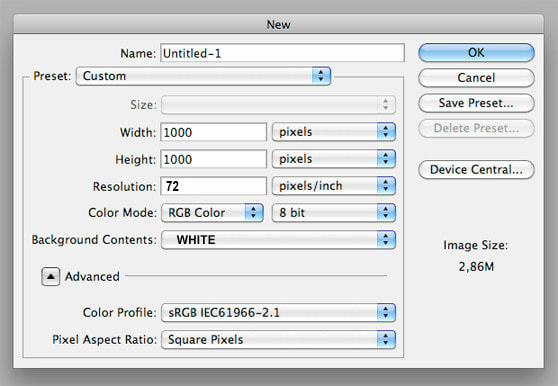
Step 1
Let's start by creating a new 1000 x1000 pixels document in Photoshop
with a high resolution - 300 pixels/inch since it is destined to print
textures and vector resources to finalize the composition.
At the end I will show you how to apply the final design to a cd case mock-up template.
_____________________________________________________________________________
Step 1
Let's start by creating a new 1000 x1000 pixels document in Photoshop
with a high resolution - 300 pixels/inch since it is destined to print
Step 2
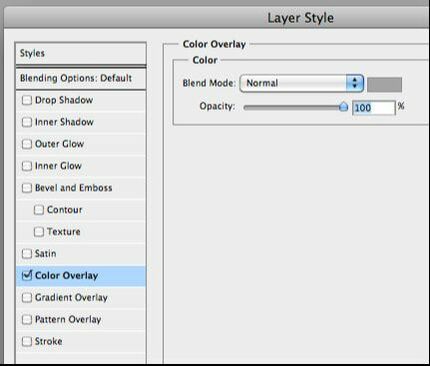
Double Click the Right side of the Layer, in the empty Gray space to the right of the word "Layer 1"
This will give you the Layer Style Menu - Click the WORDS "Color Overlay"
Fill the background with a subtle grey (#a4a5a5).
Name this Layer: Step 2 - Color Overlay
Save your file: Name_IndieRockTute_PdX in the PSD Folder
|
|
Step 3
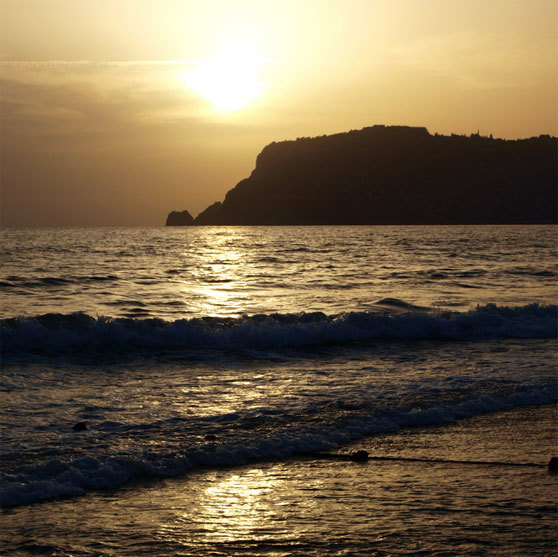
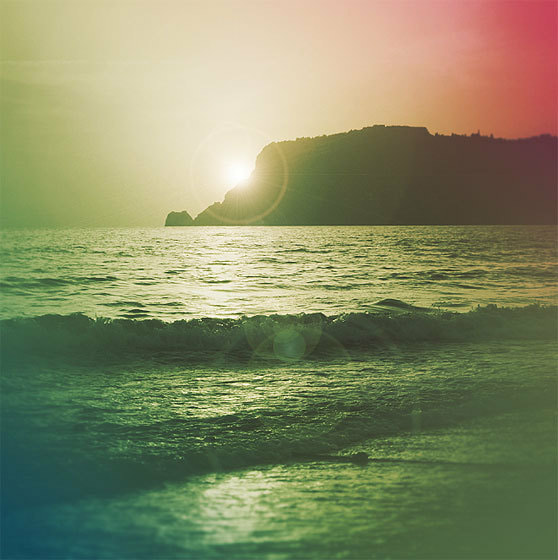
Open (Control "O"), Copy (Control "C") Deselect (Control "D") and Paste (Control "V")
and Resize (Control "T" > Enter) the image of the Beach / Ocean / Sunset into the page.
Open (Control "O"), Copy (Control "C") Deselect (Control "D") and Paste (Control "V")
and Resize (Control "T" > Enter) the image of the Beach / Ocean / Sunset into the page.
Step 4
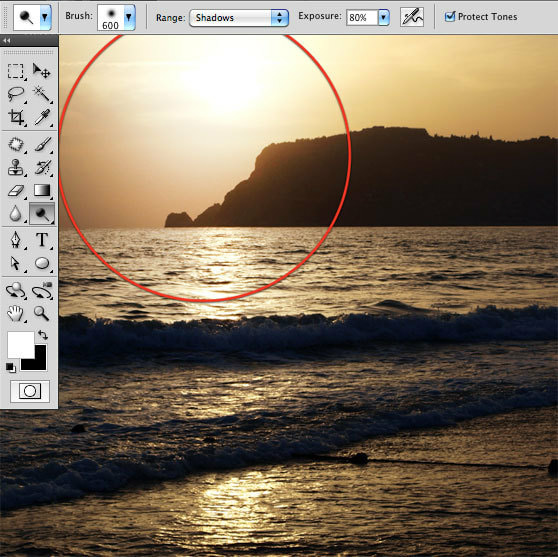
With the Dodge tool, click over the sun to lighten that area.
The Dodge tool allow you to choose a specific brush.
Make sure to select a large, round and soft (hardness 0%) brush.
With the Dodge tool, click over the sun to lighten that area.
The Dodge tool allow you to choose a specific brush.
Make sure to select a large, round and soft (hardness 0%) brush.
Step 5
Let's switch to the Burn tool to darken the edges of the composition.
Set the tool to "Shadows" mode and gently paint always with a soft brush.
Let's switch to the Burn tool to darken the edges of the composition.
Set the tool to "Shadows" mode and gently paint always with a soft brush.
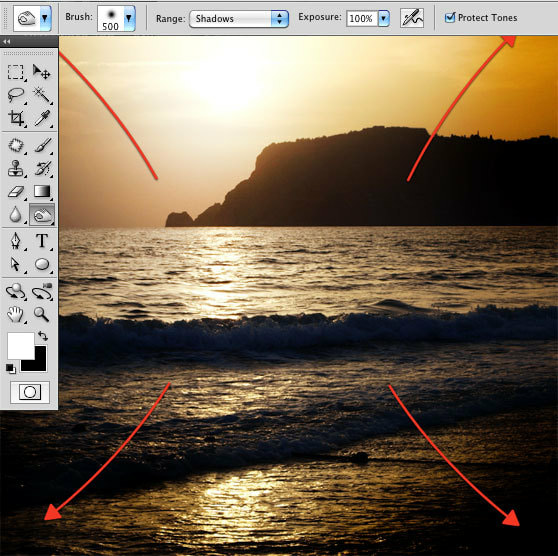
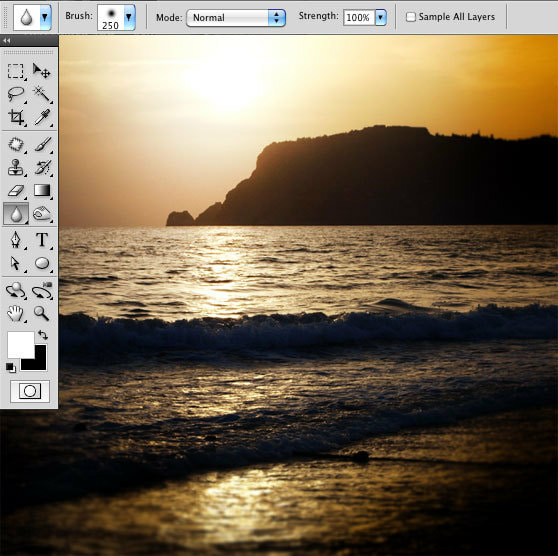
Step 6
At this point, grab the Blur tool. The aim is to give depth to the composition.
So paint again over the edges, always with a soft, large brush.
Here is my result:
At this point, grab the Blur tool. The aim is to give depth to the composition.
So paint again over the edges, always with a soft, large brush.
Here is my result:
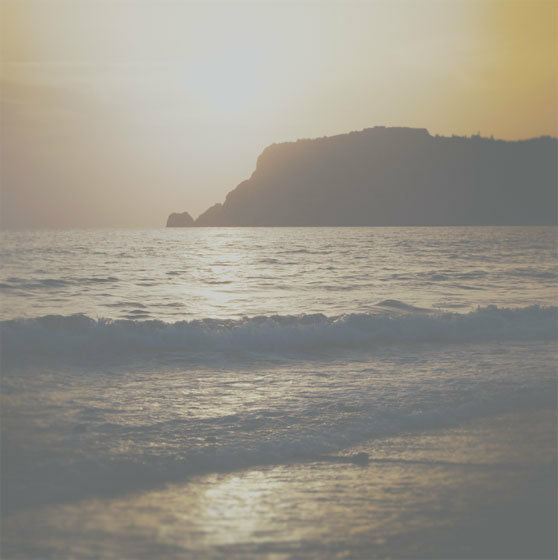
SAVE! Control "S"! Step 7
Set the Layer Blending Mode to Soft Light.
In this way the beach will merge the grey background.
The result is not so cool but, don't worry, we will fix it soon.
Set the Layer Blending Mode to Soft Light.
In this way the beach will merge the grey background.
The result is not so cool but, don't worry, we will fix it soon.
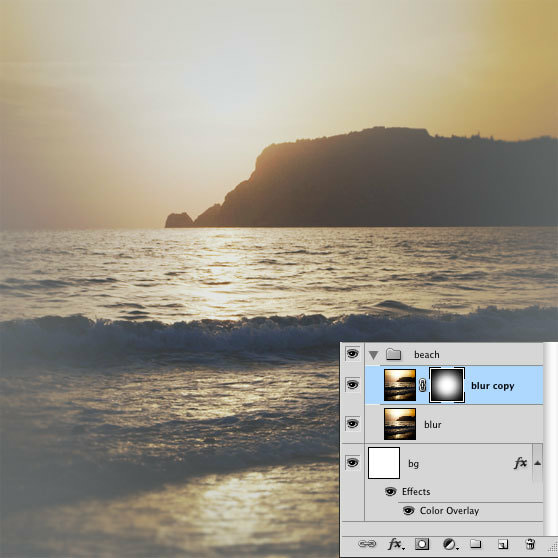
Step 8
Press Control "J" to duplicate the beach layer. Now a step a little bit tricky:
with the duplicated layer selected, add a layer mask by pressing the "add layer mask button",
which is at the bottom of the layers window.
Make sure to have black as foreground color and press alt+delete to fill with black the layer mask.
The duplicated layer disappeared. This is due to the layer mask filled with black.
We will use a white brush to replace pixels simply by painting over the mask.
Choose a large soft white brush and make a spot over the center, and the central area will be replaced.
Why using the layer mask when we could simply erase the edges of the duplicated layer with the Eraser tool?
The power of the layer mask is that it allows you to delete and replace pixels at any time.
This is why I always prefer the Layer mask rather then the Eraser tool.
SAVE! Control "S"! Step 9
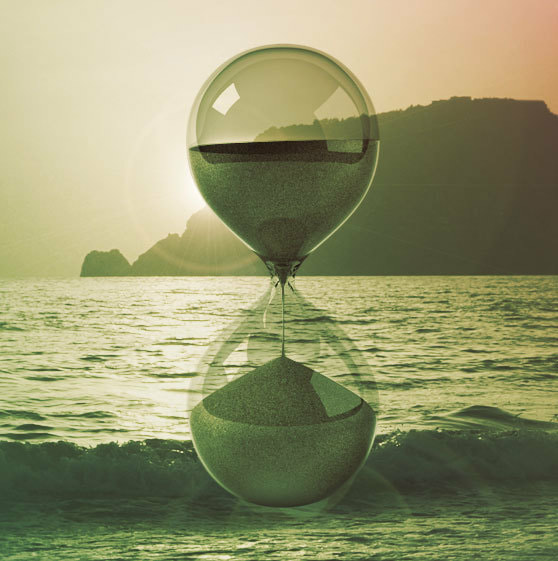
Create a new group and title it "Adjustments". Here we will put in all the color corrections.
Keep in mind that this group will be always on top of all the other layers.
The first adjustment consists in lowering down saturation.
Go to Layer > New Adjustment Layer > Hue/Saturation and reduce saturation to -70.

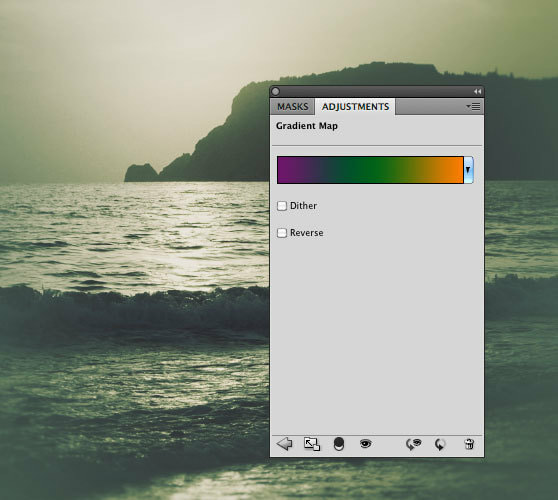
Step 9 continued
Add a Gradient Map layer going from purple (#6f156c) to green (#00601b) to orange (#fd7c00).
Set the Layer Blending Mode to Overlay with opacity about 30%.
Add a Gradient Map layer going from purple (#6f156c) to green (#00601b) to orange (#fd7c00).
Set the Layer Blending Mode to Overlay with opacity about 30%.
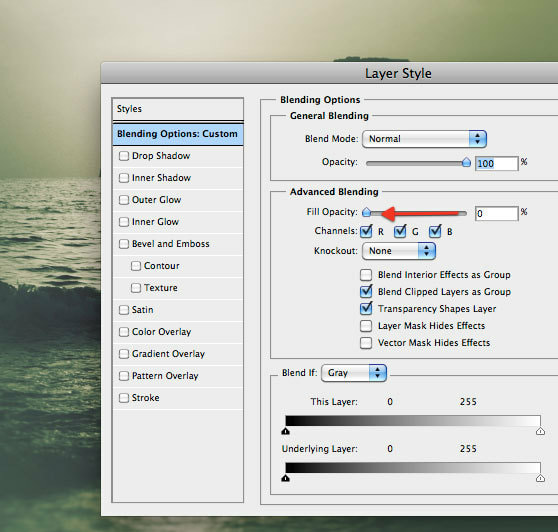
Step 9 continued
Create a new layer and fill it with a color of your choice (it's not important).
Right-click on the layer thumbnail and select Blending options.
Reduce fill opacity to 0%:
Create a new layer and fill it with a color of your choice (it's not important).
Right-click on the layer thumbnail and select Blending options.
Reduce fill opacity to 0%:
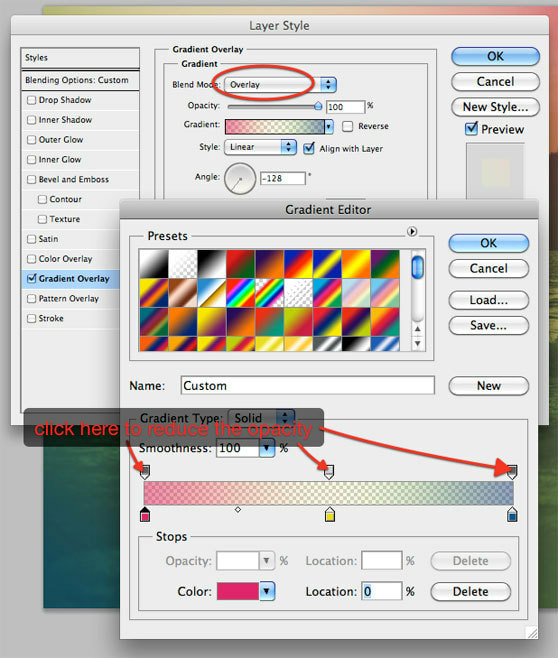
Step 9 continued
Add a Gradient Overlay going from Pink (#e1006a) to Yellow (#ecdb1f) to Blue (#025b94).
By clicking on the arrow on top of the color picker, you can set up the opacity of each color.
Reduce the values (50%) so the effect will be more soft.
Name this Layer: Step 9 - Color of Choice / Gradient Overlay
SAVE! Control "S"! Step 10
Remember that the adjustment group needs to be always on top.
Create a new layer - below - and fill it with black.
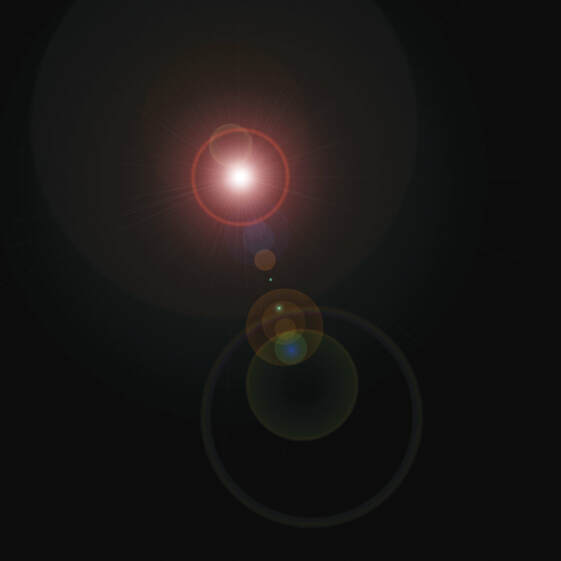
Go to Filter>Render>Lens Flare and select the 50-300mm zoom lens.
Remember that the adjustment group needs to be always on top.
Create a new layer - below - and fill it with black.
Go to Filter>Render>Lens Flare and select the 50-300mm zoom lens.
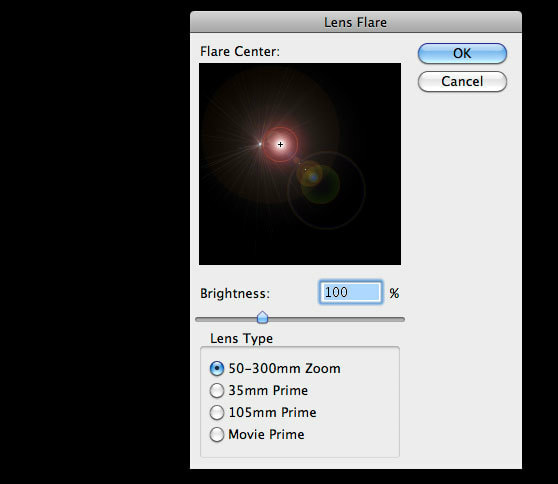
Set the layer to Screen . . . The cool lens flare effect! . . .
Name this Layer: Step 10 - Lens Flare
Name this Layer: Step 10 - Lens Flare
If the Lens Flare Filter Function didn't work for you, maybe this will work.
Save the image below in your Reference Folder, and then Open, Copy & Paste into the Step 10 Layer.
If it doesn't work, no big deal.
Save the image below in your Reference Folder, and then Open, Copy & Paste into the Step 10 Layer.
If it doesn't work, no big deal.
SAVE! Control "S"!
Step 11
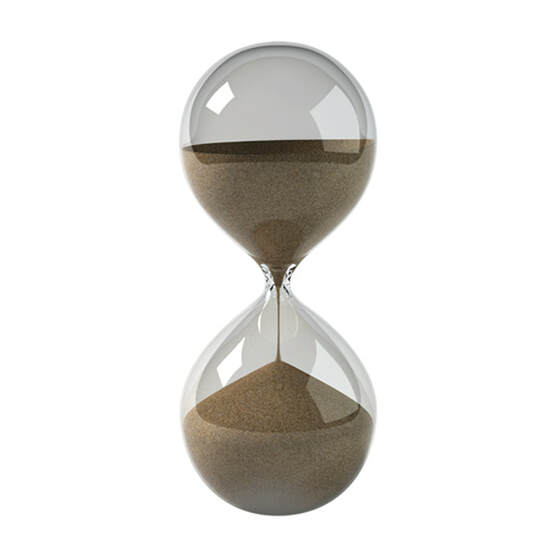
Now that the background is complete, you can put in whatever you prefer.
In my case, I decided to play around the concept of time, so I downloaded the image of an hour glass.
Open the image in Photoshop, Select it, Copy and Paste into the page you are working on.
Erase all the white area around the outside of the Hour Glass.
Step 11
Now that the background is complete, you can put in whatever you prefer.
In my case, I decided to play around the concept of time, so I downloaded the image of an hour glass.
Open the image in Photoshop, Select it, Copy and Paste into the page you are working on.
Erase all the white area around the outside of the Hour Glass.
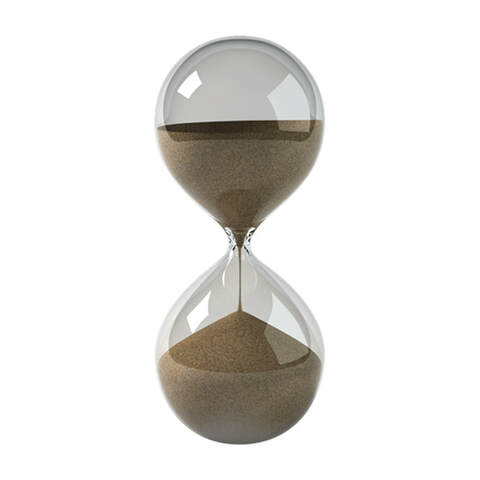
Paste the image into the main canvas and re-size it Control "T".
Step 12
As you may notice, there's a problem with the transparency of the glass...
the problem is that the glass is not transparent! Let's fix this bug.
Duplicate the hourglass layer = Control "J"
and set the duplicated layer's blending mode to multiply with opacity 90%.
As you may notice, there's a problem with the transparency of the glass...
the problem is that the glass is not transparent! Let's fix this bug.
Duplicate the hourglass layer = Control "J"
and set the duplicated layer's blending mode to multiply with opacity 90%.
Zoom in and, from the layer set on normal - below, erase the area that should be transparent.
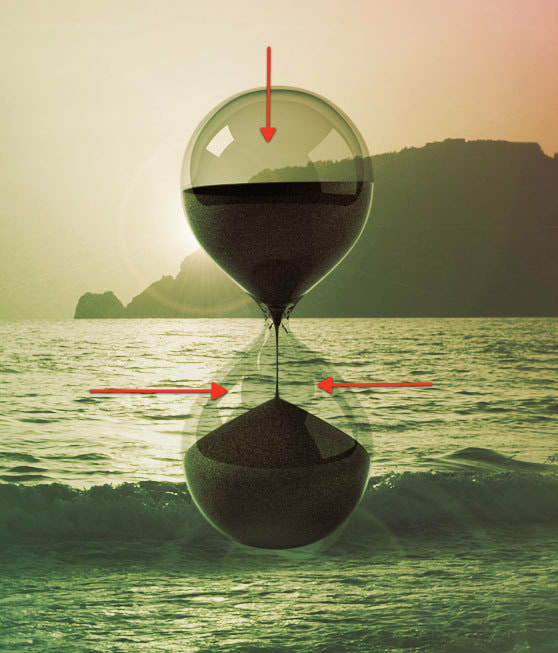
Select the layer set on multiply and erase the area where there's the sand.
In this way, the sand of the layer below - more saturated - will appear.
In this way, the sand of the layer below - more saturated - will appear.
SAVE! Control "S"! Step 13
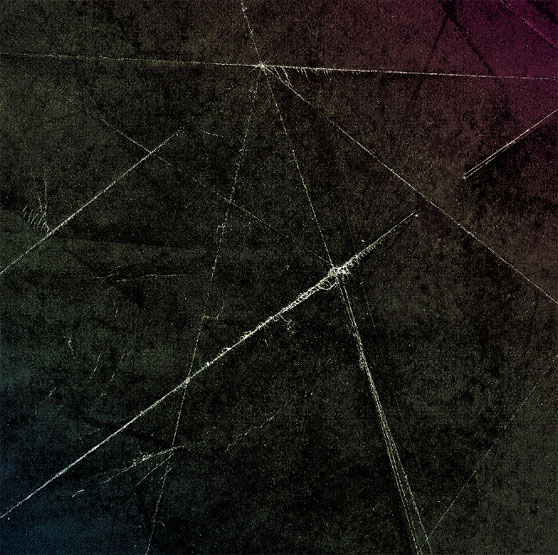
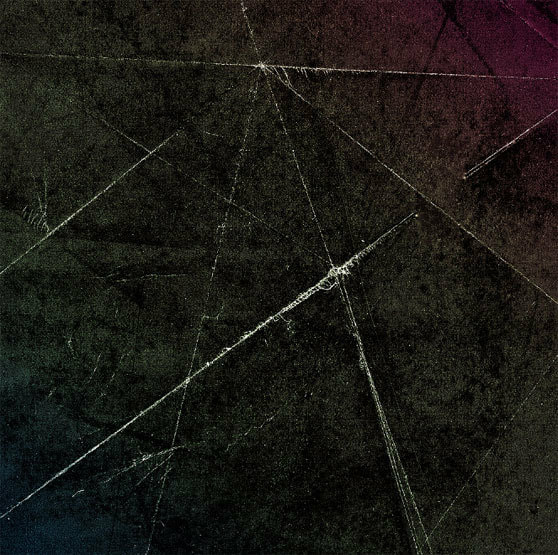
Radial Lines: We will create this part in Illustrator.
Save the Image below in the Reference Folder.
Make a new page in Illustrator: 8.5 x 11
Place the Image below into that page
Radial Lines: We will create this part in Illustrator.
Save the Image below in the Reference Folder.
Make a new page in Illustrator: 8.5 x 11
Place the Image below into that page
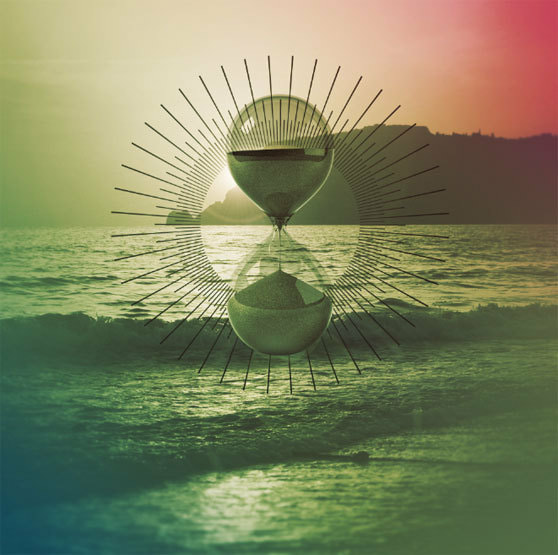
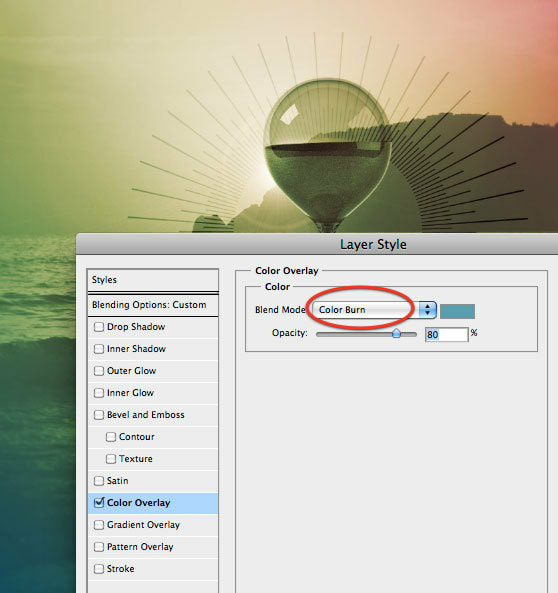
Reduce fill opacity to 0% then add a light blue (#599fac) color overlay with opacity 80%.
SAVE! Control "S"! Step 14
For the text, use Century Gothic, All Caps, Centered.
The only effect added to the text is a 1px drop shadow,
just to enhance it a little bit.
For the text, use Century Gothic, All Caps, Centered.
The only effect added to the text is a 1px drop shadow,
just to enhance it a little bit.

Step 15
To complete the composition, let's play with a couple of our textures.
Open, Copy and Paste the Textured Paper Image from your Reference Folder
into the page.
Apply the sharpen filter (Filter>Sharpen>Sharpen) to enhance the details.
SAVE! Control "S"!
To complete the composition, let's play with a couple of our textures.
Open, Copy and Paste the Textured Paper Image from your Reference Folder
into the page.
Apply the sharpen filter (Filter>Sharpen>Sharpen) to enhance the details.
SAVE! Control "S"!
Set the layer to overlay and reduce opacity to about 30%. Cool result, don't you agree?

The photo composition is done!
SAVE! Control "S"! File Name: (Your First) Name_IndieRockAlbumCvr_Pd?
Save the PSD (Layered / Editable) File
Export as a JPG:
Go To: File > Export > Export As ≥ JPG ≥ Export (Put it in your Flash Drive)
Upload the correctly named File
SAVE! Control "S"! File Name: (Your First) Name_IndieRockAlbumCvr_Pd?
Save the PSD (Layered / Editable) File
Export as a JPG:
Go To: File > Export > Export As ≥ JPG ≥ Export (Put it in your Flash Drive)
Upload the correctly named File
