.
2018 PERSONAL CD PROJECT: FINAL ART PREPARATION
In this project, you will set up a Presentation Piece in Illustrator.
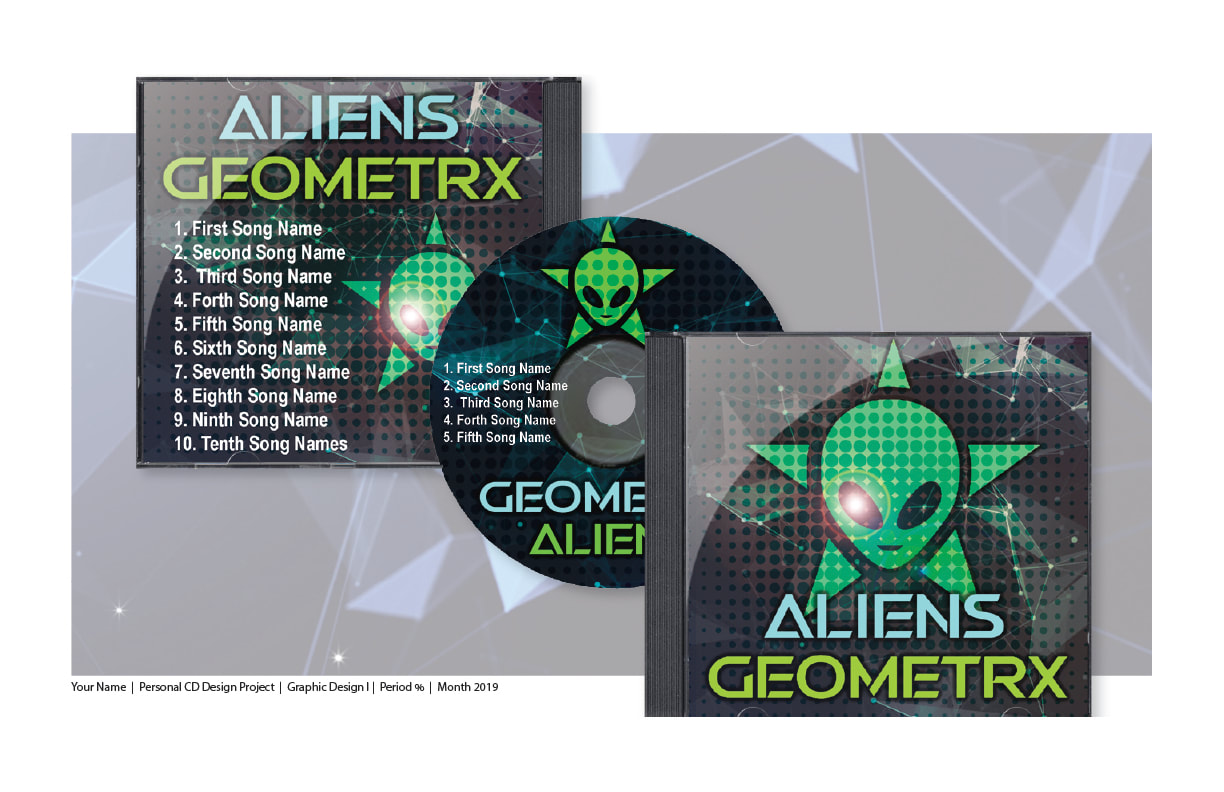
Look at the image below. This is how your Final Art will look.
The following are your Specs (specifications):
Page Size: 17 x 11 INCHES!!!!!!!
Orientation: Landscape (Tabloid, Landscape)
Layout: Use my picture as a Template to put YOUR Artwork (Layout) over.
Name this Layer: Template - it goes on the Bottom. Lock it and Dim it to 50%.
Make sure to SIZE the Template to fit on the Page Size you have made.
Make a new Layer and Name that "BG". This will be the Background Layer.
Make another New Layer and Name it CD Parts.
STEP 1:
You will "Place" each of the CD Parts here.
Start with the back in the case:
Place & Resize the "BACK in the Case JPEG" to the size & position it is here.
Next, Place & Resize the "CD TIFF"
Next, Place & Resize the "COVER in the CASE" to the size & position it is here.
Now, in the CD Parts Layer, you will see a small circle to the right side of that Layer - Click it.
That will select everything on that Layer.
With those 3 parts selected, Go up to "Effects", Choose "Stylize" in the Illustrator Effects (Top section).
Choose "Drop Shadow" and Change the Opacity to 25%.
Save this as Follows: Your Name (First Only)NameCD_PresentationPd% . . .
Save it in The Personal CD Project Folder, just out in the Folder
STEP 2: The Background:
Find a Wide Image that will look nice behind your 3 CD Parts.
Look for a wide picture that will fill the space in that rectangle behind the CD Parts.
(See the Picture below)
Please use Firefox as the Browser, you'll be able to Right Click: Copy Image
And simply "Paste" (Control V) it into the BG (Background) Layer.
Resize that image to be as wide as the rectangle.
DO NOT SQUEEZE IT ALL TOGETHER,
if there is extra picture above & below, we will make a Clipping Mask to fit.
Now, hold Shift and slide that picture off the page.
Now make a rectangle, with the rectangle tool, the size of the rectangle in the Template.
Now, select BOTH the Rectangle and the Image, Center the with the Alignment Tools:
Make sure the Align Box (Top of the Page, left of the Alignment tools) is set on Align to Artboard.
Right Click, "Make Clipping Mask".
Now, keep that Background selected, go up to "Opacity" and set it on 25%.
Finally, type your Gallery Signature as indicated at the bottom left of the Background.
You need to type your Full Name
2018 PERSONAL CD PROJECT: FINAL ART PREPARATION
In this project, you will set up a Presentation Piece in Illustrator.
Look at the image below. This is how your Final Art will look.
The following are your Specs (specifications):
Page Size: 17 x 11 INCHES!!!!!!!
Orientation: Landscape (Tabloid, Landscape)
Layout: Use my picture as a Template to put YOUR Artwork (Layout) over.
Name this Layer: Template - it goes on the Bottom. Lock it and Dim it to 50%.
Make sure to SIZE the Template to fit on the Page Size you have made.
Make a new Layer and Name that "BG". This will be the Background Layer.
Make another New Layer and Name it CD Parts.
STEP 1:
You will "Place" each of the CD Parts here.
Start with the back in the case:
Place & Resize the "BACK in the Case JPEG" to the size & position it is here.
Next, Place & Resize the "CD TIFF"
Next, Place & Resize the "COVER in the CASE" to the size & position it is here.
Now, in the CD Parts Layer, you will see a small circle to the right side of that Layer - Click it.
That will select everything on that Layer.
With those 3 parts selected, Go up to "Effects", Choose "Stylize" in the Illustrator Effects (Top section).
Choose "Drop Shadow" and Change the Opacity to 25%.
Save this as Follows: Your Name (First Only)NameCD_PresentationPd% . . .
Save it in The Personal CD Project Folder, just out in the Folder
STEP 2: The Background:
Find a Wide Image that will look nice behind your 3 CD Parts.
Look for a wide picture that will fill the space in that rectangle behind the CD Parts.
(See the Picture below)
Please use Firefox as the Browser, you'll be able to Right Click: Copy Image
And simply "Paste" (Control V) it into the BG (Background) Layer.
Resize that image to be as wide as the rectangle.
DO NOT SQUEEZE IT ALL TOGETHER,
if there is extra picture above & below, we will make a Clipping Mask to fit.
Now, hold Shift and slide that picture off the page.
Now make a rectangle, with the rectangle tool, the size of the rectangle in the Template.
Now, select BOTH the Rectangle and the Image, Center the with the Alignment Tools:
Make sure the Align Box (Top of the Page, left of the Alignment tools) is set on Align to Artboard.
Right Click, "Make Clipping Mask".
Now, keep that Background selected, go up to "Opacity" and set it on 25%.
Finally, type your Gallery Signature as indicated at the bottom left of the Background.
You need to type your Full Name
After all of the above is done, make sure you back up ALL YOUR WORK on your Flashdrive.
