HOW-TO Exercise #5 - How to Use Filters - January 8th - January 16th
| p3_howto_use_filters.pdf |
HOW-TO Exercise Number 4 - How to use Painting Tools
| p2_howto_use_painting_tools.pdf |
HOW-TO Exercise Number 3: How to Use Drawing Tools
Click on the following File to Download the Exercise to work through . . .
| p2_howto_use_drawing_tools.pdf |
"HOW-TO" Exercise Number 2:
This Exercise is Due Friday, November 30th - the week we return from our Holiday Break
This "How-To" Exercise is about how to add text to a Photoshop File.
While you may have done that before, please work on this exercise so that you get better at it. The Photoshop Certification Exam will be in January.
These How-To Exercises will make passing that test a little easier. Please download and keep this exercise - along with the last one - in a Folder on your 562 Server and on your Flash Drive. You will be graded on having these Exercises by Mid-Term. You're doing great - keep it up!
| p2_howto_add_text.pdf |
"How-To" Number 1: Due Date: The Friday before we go to break: November 16th
Each Week I will try to supply you with an Exercise that will help you know more about Photoshop. You will get 100 Points for your work on this as it will be graded as an Assignment. Download the PDF File below and begin work on this "How To" Exercise at your own pace. I would like you to try to do this exercise within the next 2 weeks. Be aware you will have to have some images to work on. Review the Exercise first to see what kind of Images they are using. Then, look on the web for some High Resolution Images (600,700 and 800 pixels) that you can work on.
| p1_howto_retouch_photos.pdf |
LAYER MASKS TUTORIALS - Week of 10/22
See below the Quiz for the Layer Mask Tutorial

Click on the "Ps" Square at Left
to go directly to a 10-Question
Practice Exam for Photoshop.
Photoshop 101: How To Use Layer Masks:
In this short tutorial you will learn what layer masks are and how to utilize them for working faster and more efficiently in Photoshop.
Lets consider what masks do: They hide or show things. Masks in photoshop work the same way: they can hide or show parts of images.
In general filling a layer mask with black hides a part of the image.
Filling a layer mask with white shows a part of an image.
Filling the mask with gray will show the part of the image with varying opacity based on how light or dark the gray is.
Step 1:
Select two photos that you want to combine and place them in your Photoshop document.
I just selected two random photos that I found on the internet for the purposes of this tutorial.
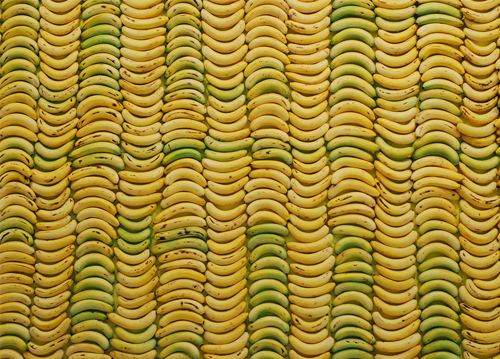
Photo 1: A giant wall of bananas:
Right Click on the Wall of Bananas (below, left) and "Save Image as" in a Photoshop Practice Folder.
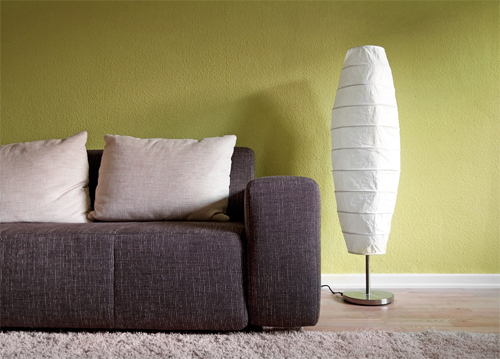
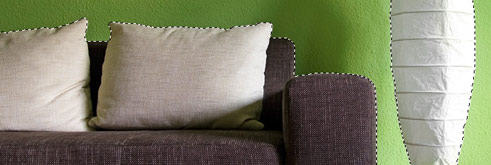
Photo 2: A nice comfy living room setting:
Right Click on the The Cozy Living Room (below, right) and "Save Image as" in the same Photoshop Practice Folder.
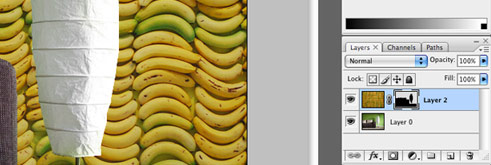
Open the Bananas File and keep that photo on the bottom.
Open the Living Room File, Select All, Copy and Paste it into the Bananas File.
Make sure the Living Room Layer is above the Bananas
Note: I think the writer of this Tutorial has the sample pictures wrong below . . .
he has the Bananas on top, and the Living Room picture below.
Follow his directions - do what he says - not what he does.
I put the pictures in the order he SAYS and it all worked!
Lets consider what masks do: They hide or show things. Masks in photoshop work the same way: they can hide or show parts of images.
In general filling a layer mask with black hides a part of the image.
Filling a layer mask with white shows a part of an image.
Filling the mask with gray will show the part of the image with varying opacity based on how light or dark the gray is.
Step 1:
Select two photos that you want to combine and place them in your Photoshop document.
I just selected two random photos that I found on the internet for the purposes of this tutorial.
Photo 1: A giant wall of bananas:
Right Click on the Wall of Bananas (below, left) and "Save Image as" in a Photoshop Practice Folder.
Photo 2: A nice comfy living room setting:
Right Click on the The Cozy Living Room (below, right) and "Save Image as" in the same Photoshop Practice Folder.
Open the Bananas File and keep that photo on the bottom.
Open the Living Room File, Select All, Copy and Paste it into the Bananas File.
Make sure the Living Room Layer is above the Bananas
Note: I think the writer of this Tutorial has the sample pictures wrong below . . .
he has the Bananas on top, and the Living Room picture below.
Follow his directions - do what he says - not what he does.
I put the pictures in the order he SAYS and it all worked!
|
|

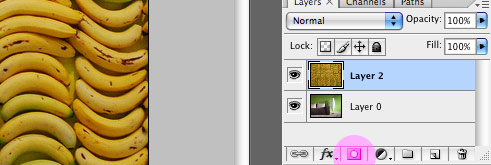
Step 2: Select the living room photo in the layers palette and click on the mask icon at the bottom.
(if you cant see it go to view>Layers) This creates the layer mask.
You should notice a white box next to your layer with a little link.
(if you cant see it go to view>Layers) This creates the layer mask.
You should notice a white box next to your layer with a little link.
Step 3: Select the couch area of photo 2 using your selection tool of choice.
This is the area of the photo we are going to hide. After this area is selected . . .
This is the area of the photo we are going to hide. After this area is selected . . .
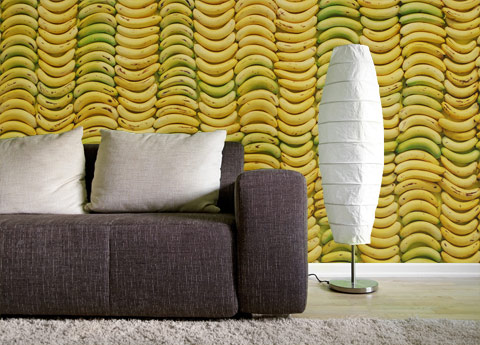
Step 4: With the banana layer selected fill the couch area with black.
Filling the mask with black tells Photoshop to hide this part of the photo.
The banana background should now show through.
Your image should now look like this:
The banana background should now show through.
Your image should now look like this:
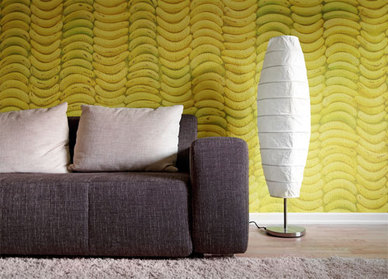
With a few simple tweaks you can show the texture of the wall and the shadows
by setting the blending mode of the banana layer to soft light.
by setting the blending mode of the banana layer to soft light.
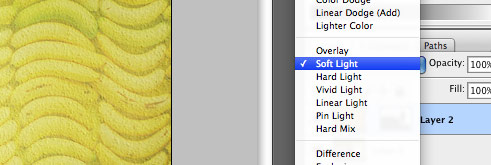

I hope it worked! Such lovely Wall Paper!
